|


|

Organfront
|
This tab shows the front of the organ and if you click on the picture you will see the church.
|

Church
|

Original stops panel
|
On this tab a simple representation of the original stops of this organ.
The layout follows reality as much as possible.
The button "Motor" turns the wind engine on.
Note:
Do not adjust the speed of the tremulant. Because the tremulant of the Scherp will no longer be in sync with the other voices of the Rugwerk.
With the 3 sliders at the top right, the volume of the different channels can be set, which allows you to broadly determine your listening position.
A good starting position is e.g. Fr 25 Mi 65 Re 100
In the middle you will find the expanding step and this serves the doors of the Borstwerk wich is a kind of a swell.
Above the register button "Gedekt 8 vt." from the Borstwerk there is a light/button. If you press it, you will hear a buzzer.
Important: We don't like the recorded tremulant of the Borstwork, especially if you use a lot of volume on "Front". By means of the blue/yellow LEDs on the left
of the buttons you can choose per voice whether you want to hear the recorded tremulant or the "Hauptwerk" modulating variant.
Blue = recorded'.
Yellow = modulating.
|
|
3. Uitgebreid (Extended):
|
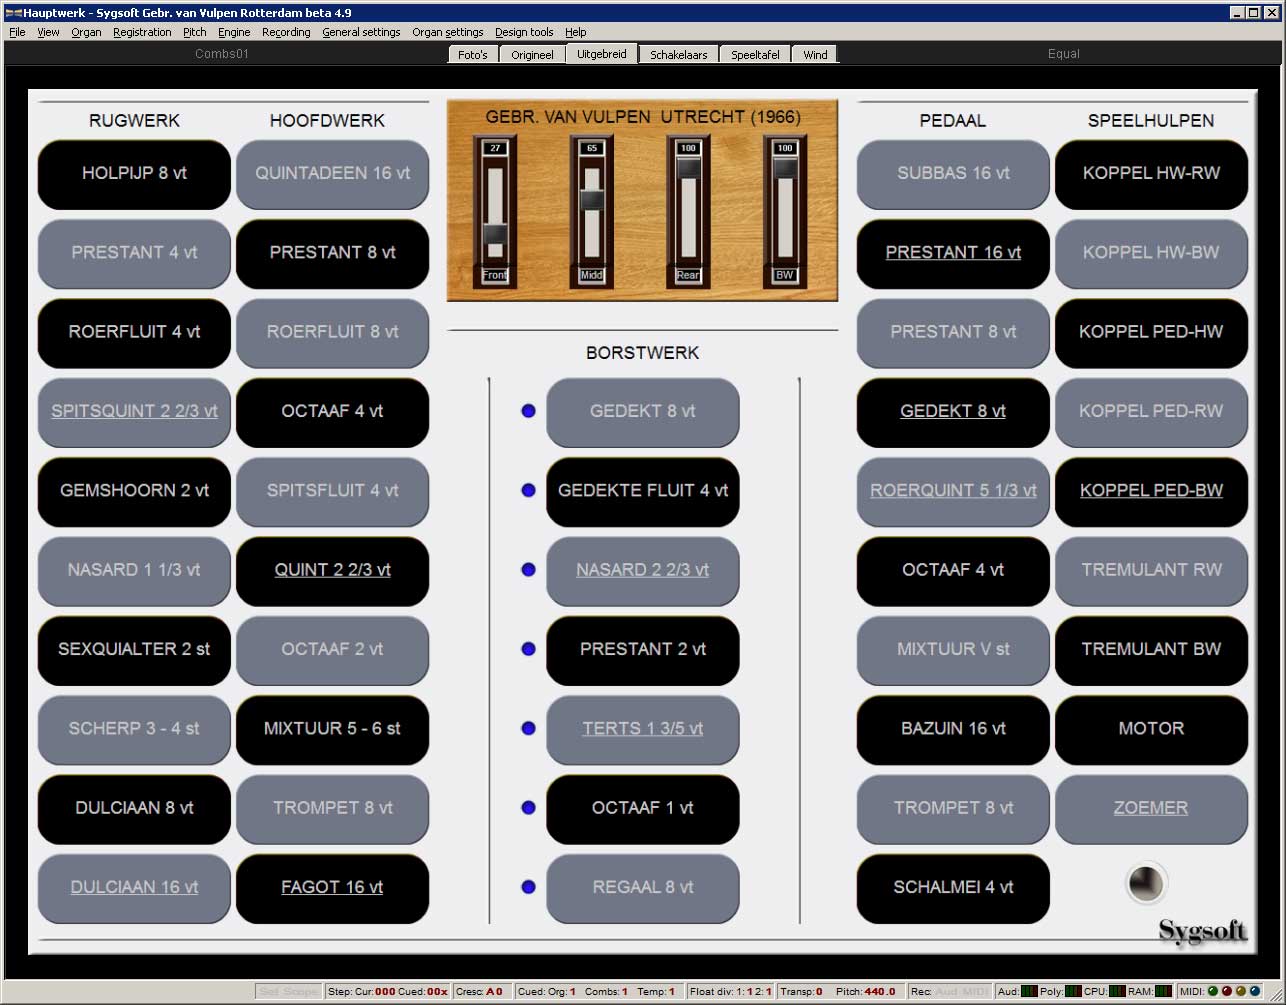
Extended stop panel
|
On this tab a simple representation of all the stops of this sample set.
The layout follows not the reality.
The button "Motor" turns the wind engine on.
Note:
Do not adjust the speed of the tremulant. Because the tremulant of the Scherp will no longer be in sync with the other voices of the Rugwerk.
With the 3 sliders at the top right, the volume of the different channels can be set, which allows you to broadly determine your listening position.
A good starting position is e.g. Fr 25 Mi 65 Re 100
At the bottom right there is a "Buzzer" button that turns on the light below and sounds the buzzer.
Important: We don't like the recorded tremulant of the Borstwork, especially if you use a lot of volume on "Front". By means of the blue/yellow LEDs on the left
of the buttons you can choose per voice whether you want to hear the recorded tremulant or the "Hauptwerk" modulating variant.
Blue = recorded'.
Yellow = modulating.
|
|
3. Schakelaars: (Switches)
|

Switches
|
Most elements of this tab do not actually need to be visible, but for interested parties it still gives a
a bit of an impression of what needs to be done to get a sample set of this size to work.
Keep in mind that behind each (manual) button there are 56 long, 56 long release, 56 medium release and 56 short release samples and about the same amount for the recorded tremulant.
The same applies to the pedal, but always 30 pieces.
It is also useful to know that if you right-click on a switch you can immediately access the correct voicing screen.
In the column "Speelhulpen" (Playing aids) you will find two buttons:
With the button "Trekkergeluid" (Tracker noise) you can choose whether or not to hear the sounds of the trackers.
With the button "Toetdgeluid" you can choose whether or not you want to hear the key sounds.
|

The virtual console
|
On this tab you will find a global virtual representation of the console
This allows you to easily connect the keyboards and the pedal to Hauptwerk via MIDI.
|

The windmodel
|
On these tabs a schematic representation of the wind supply of this organ.
With the various sliders you can control the supply of wind for the bellows and the various wind chests.
With the "R" or reset buttons you can return to the settings that we think are the most suitable (default values).
With the button "Sygsoft" at the bottom right you can reset all 7 sliders in one time.
Important:
If you decide not to load a part of this sample set (e.g. your computer RAM memory is too small and you choose e.g. to
omitting all "Rear" samples) then the wind consumption decreases by 33% and then the organ becomes much less wind sensitive than
it actually is.
In that case, go to Organ settings/Organ preferences/Wind supply model and choose a value of approx. 150.
In case you only need to load one channel e.g. "Middle", (the wind consumption decreases by 66%) then you need this value to about 300% to get the same result.
Obviously, you can choose any value if you don't like the organ's behavior.
With the check mark on this same Wind supply model tab you can turn off the wind supply completely.
|
|
|
Hauptwerk.nl is an initiative from Sygsoft Holland. KvK 93602855. Last updated
2024-04-20
|
|
|
